
Have you ever passed by a piece of old, worn-out furniture and wondered about the stories it could tell? There's something truly captivating about restoring such pieces, about unveiling their hidden charm and potential. Welcome to the world of furniture restoration.
This comprehensive guide will help you master the art of restoring furniture. From understanding why restoration is a rewarding endeavor to learning practical tips and techniques, we're going to take a deep dive into everything you need to know about the process.
Whether you're a seasoned DIY enthusiast or someone who's just stumbled upon an old family heirloom begging you to refurbish it, this guide is for you. It's time to roll up your sleeves and breathe new life into old, forgotten furniture.
Are you ready to journey with us into the transformative world of furniture restoration? Then read on.
Part I: Understanding the Art of Furniture Restoration

Furniture restoration is a realm where forgotten, dusty pieces get a new lease on life and become stunning centerpieces in your home. There's a certain magic to watching the transformation unfold, a process that marries your creativity with craftsmanship.
But before you dive into the heart of this art form, it's essential to understand why you should even bother restoring old furniture and how to determine if a piece is worth the effort. Ready to venture into this world of untapped potential? Let's embark on this exciting journey.
Why Restore Old Furniture?

Imagine strolling through a flea market, and a quaint old chair catches your eye. It has chipped paint, the woodwork a little scuffed, but something about it calls to you. That's the magic of old furniture – each piece has a unique story to tell, a history that adds depth to its charm.
But why should you pick it up, bring it home, and even invest time and energy into restoring it?
- Environmental Benefits: Furniture restoration is essentially recycling. By breathing new life into old furniture, you're reducing the demand for new products, thus saving trees and reducing carbon emissions from manufacturing processes. Every piece of furniture you restore is a step toward a greener Earth.
- Cost-Saving Benefits: Why buy new when you can restore and save? Old furniture, especially when purchased from yard sales or thrift stores, often comes at a fraction of the price of new furniture. Add the costs of restoration supplies to it, and you'll still find it cheaper than buying new ones.
- Personal Satisfaction & Creativity: There's unparalleled satisfaction in restoring a piece of furniture with your own hands. It's a canvas for your creativity where you can experiment with colors, textures, and styles. The result is a unique piece that's truly yours, a reflection of your personality.
In essence, when you restore old furniture, you're not only gaining a beautiful piece for your home but also saving money, saving the environment, and giving your creativity a chance to shine. How's that for a win-win?
Knowing When to Restore

Now that you've decided to embark on your furniture restoration journey, the question arises - which pieces are worth the effort? Not all old furniture is a good candidate for restoration. So, how do you make the call?
- Assessing the Damage: Consider the condition of the piece. Surface damage like scratches, minor chips, or faded finish is usually fixable. However, extensive damage like rotting wood, major structural issues, or severe termite infestation might be more trouble than it's worth.
- Evaluating the Quality: Older furniture is often higher in quality compared to many contemporary pieces. Crafted from solid wood, boasting dovetail joints, or intricate woodwork, these pieces, despite being a bit worn, are built to last and are worth the effort to restore.
- Recognizing the Potential: Sometimes, it's not just about the current condition but the piece's potential. Can you envision it fitting beautifully in a specific spot in your home? Can you imagine it in a new color or texture? If the answer is yes, then that's your piece.
- Understanding the Value: Be mindful if the piece might be a valuable antique. Sometimes, restoring can decrease its value. When in doubt, consult an expert before starting the restoration process.
Remember, restoring furniture isn't just about making something old new again; it's about recognizing the beauty beneath the surface wear and tear and envisioning what it could be. Trust your instincts; if a piece speaks to you, it's worth the effort.
Part II: Preparing for Furniture Restoration
Now that you've found your hidden gem and you’re ready to roll up your sleeves and jump into the exciting world of restoration. But wait; before you grab that paintbrush, there's a crucial step you mustn't skip – proper preparation. As the adage goes, "By failing to prepare, you are preparing to fail." So let's equip you with the knowledge (and the gear) you need to ensure your restoration project is a resounding success.
Essential Tools and Supplies for Furniture Restoration

Restoring furniture to its former glory requires creativity, patience, and the right tools and supplies. Here's a basic list to get you started:
Tools:
- Screwdrivers: For disassembling parts of the furniture if needed.
- Hammer: Useful for minor repairs and removing old nails.
- Sandpaper: Necessary for smoothing the surface and removing old paint.
- Paint brushes: To apply your choice of paint, sealer, or finish.
Supplies:
- Primer: To prepare the furniture surface for painting.
- Chalk Paint®: An excellent choice for giving your furniture a vintage, matte look.
- Paint inlays/Transfers: To add a touch of personalization and intricate design.
- Sealant: To protect your hard work and make it last longer.
Remember, quality tools and supplies will yield a quality result. So, be sure to get yourself some quality tools and supplies from a trusted supplier, such as The Owl Box.
Safety First

While diving into your project with enthusiasm is excellent, taking some safety precautions can also be wise. You're not just creating a beautiful piece of furniture; you could also be ensuring a safe DIY experience for yourself and your loved ones.
If you want to play it safe, here are some measures to keep in mind:
- Working in a Well-Ventilated Area: When using Chalk Paint® products, ventilation isn't usually a concern during the painting stage. But when you reach the waxing stage, it's generally a good idea to work in an area with good airflow, especially if you're sensitive to scents. However, working in a well-ventilated area or outside (weather permitting) can be crucial for safety and comfort if you're using other restoration supplies like sealants that emit strong fumes.
- Gloves: While they're not an absolute must, if you're concerned about the potential for splinters or prefer to keep your hands extra clean during the process, sturdy gloves could be an excellent addition to your toolkit.
- Safety Glasses: Although not strictly required, safety glasses can provide extra precaution, particularly if you're worried about the occasional rogue particle during sanding or wax application.
Restoration is a labor of love, but safety should always come first. Ensuring you follow these precautions will make the process enjoyable and worry-free.
Part III: Furniture Restoration Steps
With your tools ready and safety measures in place, you're prepared to embark on the restoration process. These guidelines will be your roadmap to transforming that shabby piece into a chic masterpiece. Let's get started.
1. Cleaning

Restoring a piece of furniture begins with a thorough cleaning. This step removes accumulated dirt, dust, and old polish that could interfere with your restoration process.
Use a mild dish soap and warm water solution, gently scrubbing the surface with a soft cloth. Be careful not to soak the wood, which could cause it to warp or crack. Once cleaned, dry it thoroughly and let it air dry further.
Pro Tip: If the piece has intricate carvings or hard-to-reach corners, use a soft-bristled brush to get into these areas.
2. Repairing

After cleaning, inspect the furniture for any damage. You can do minor repairs like fixing loose joints or tiny cracks using wood glue and clamps. However, significant damage, such as broken pieces or deep cracks, might require more extensive repairs or replacement parts.
Pro Tip: Always allow ample time for the glue to dry before moving to the next step.
3. Stripping (Not Necessary With Chalk Paint®)

Stripping is the process of removing the old finish or paint from the furniture. It's traditionally seen as an essential step in restoration, providing a clean canvas for you to work on. You would typically apply a generous amount of paint stripper, let it sit for the recommended time, then gently use a plastic scraper to remove the old finish.
However, one of the incredible benefits of using Chalk Paint® by Annie Sloan is that you can often skip the stripping process entirely. As long as the surface of your furniture is clean, you can apply Chalk Paint® directly over the existing finish or paint. This can save you significant time and effort, making your restoration project even more enjoyable.
Pro Tip: Whether you're stripping or painting over old paint, always work in small sections and take your time with the process. The more patient you are, the better the results.
4. Sanding

Most often, sanding plays a key role in furniture restoration. After stripping the old finish, you might typically sand the piece to smooth out the surface, remove any remaining finish, and prepare the furniture for the new finish. You'd usually start with coarse-grit sandpaper and gradually move to finer grits for the best result.
But here's a game changer: Sanding isn't always necessary if you're using Chalk Paint® products. If you're after a smooth finish, then a little sanding may be in order. But if you love the rustic, vintage look, you can skip the sanding and let the texture of the paint add character to your piece.
If you're going for a two-toned effect where you want to reveal a bottom layer of paint, you can apply a second color, let it dry, and then lightly sand to show patches of the first color underneath. This effect can add depth and interest to your piece.
On the other hand, if you're not using Chalk Paint®, it's often best to stick with the traditional approach and sand all surfaces to remove lumps, bumps, and texture. This step can be labor-intensive but can lead to a smoother, more predictable finish.
Pro Tip: When sanding is necessary, always sand along the grain of the wood, not against it, to avoid scratches.
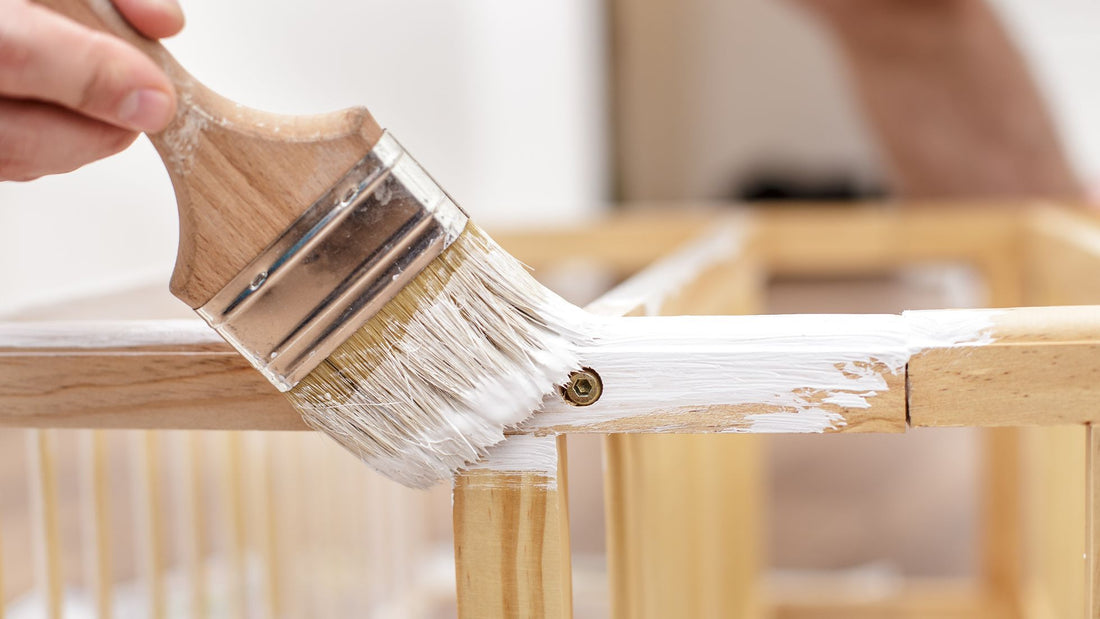
5. Painting/Finishing

Once you’ve prepared your piece, it's time for the most exciting part - painting and finishing. This is where you get to inject personality into the piece.
Chalk paint® is a fantastic option for furniture restoration. It adheres well to most surfaces without needing a primer or stripper and provides a gorgeous, matte finish that can lend a rustic, vintage feel to your piece.
We offer a wide array of Chalk Paint® at The Owl Box in various hues to match your decor and taste. Remember to stir your paint thoroughly before use and apply evenly with a high-quality paintbrush for a smooth finish.
For a unique touch, consider adding paint inlays or transfers. They can provide an additional layer of detail and personalization to make your piece truly unique. Check out our beautiful selection of paint inlays and transfers.
Pro Tip: Apply two thin coats of Chalk Paint® for the best coverage and finish. Let the first coat dry thoroughly before applying the second.
6. Sealing

After your paint has dried, the final step is to seal your piece. Sealing is critical in restoration as it protects your hard work and ensures the finish lasts for years.
Chalk Paint® wax is a fantastic sealer for Chalk Paint®. It enhances the color, gives a desirable sheen, and adds a layer of protection.
Ready for the finishing touch? Time to apply a fine layer of wax. When using a wax brush, you'll find that the wax absorbs right into the Chalk Paint® like magic. Once applied, promptly remove any excess wax with a lint-free cloth. The result? A soft, alluring sheen that brings your piece to life.
If you're after an extra bit of shine, allow it to sit for 24 hours, and then give the piece a gentle buff with a soft cloth. It's all about the details, after all. Remember, though, the wax will continue to cure over the next couple of weeks, culminating in a sturdy and protective finish.
You can find a variety of high-quality Chalk Paint® waxes in our store to add the perfect finishing touch to your masterpiece.
Pro Tip: Applying wax in thin coats is key. Too much wax can make the finish feel sticky.
Part IV: Tips and Techniques for a Successful Furniture Restoration

Finally, to ensure your restoration journey is smooth sailing, let's delve into some expert tips and common mistakes to avoid. These nuggets of wisdom could be the difference between a good restoration and a great one.
Expert Tips
Drawing on insights from seasoned restorers, here are some expert tips to keep in mind during your restoration process:
- Patience is Key: Never rush a restoration project. Good results take time.
- Test First: Always test your paint or finish on an inconspicuous area first to ensure you're happy with the color and finish.
- Less is More: When applying paint, wax, or other finishes, remember it's easier to add than remove. Start with thin layers.
- Clean as You Go: Keep your workspace clean and organized. This helps prevent accidents and makes the process more enjoyable.
Common Mistakes to Avoid
Even the most experienced restorers can make mistakes. Here are a few common pitfalls and how to avoid them:
- Skipping Preparation: As tempting as it may be to dive right into painting, pay attention to the preparation steps.
- Ignoring Safety Measures: When necessary, prioritize your safety, even if the measures seem time-consuming at first.
- Not Letting Coats Dry: Each layer—paint, primer, or sealer—needs adequate drying time for best results.
- Forgetting to Seal: Always seal your work to protect it and ensure longevity.
With these expert tips and warnings, you're now armed with the knowledge to start your furniture restoration project. Let the journey to reveal the hidden beauty in your furniture begin.
Conclusion
Restoring furniture is much more than just a project. It's an opportunity to breathe new life into forgotten pieces, infuse creativity into your home, and create something unique that speaks to your style. It's about seeing the potential beneath years of wear and tear, under layers of outdated paint, and within minor imperfections.
Every nick, scratch, and faded patch tells a story; with your care, these old pieces can start a new chapter in your home.
At The Owl Box, we believe in the magic of transformation with furniture restoration. With a bit of patience, the right tools, and high-quality supplies like our Annie Sloan Chalk Paint® and wax, you can uncover the hidden charm of an old piece of furniture and make it your own.
So, embrace the process, cherish the journey, and, most importantly, have fun. Remember, even the tiniest details can make a big difference in furniture restoration. We can't wait to see the masterpieces you create. Happy restoring!